InstantAIguru Admin Guide
Complete reference for the Admin Portal and Chat Dashboard
Quick Start Guide — 4-Step Setup
Your Guru comes with sensible defaults that work out of the box. To personalize it, just configure these essentials and click Save:
Click Modify Email/Password to set your login password. Fill in the Owner of the domain field with your company name. Enter your Support Contact Info — this URL or contact info will be appended to all error messages shown to your end-users.
Enter a Guru Name. Then fill in Tell your Guru who he/she is and his/her skills (identity and expertise) and Tell your Guru what it is tasked with (its primary job).
In the right-side Preview Panel: set the Chat Header Caption (what appears at the top of the widget), write your Welcome Message (the first thing visitors see), and fill in up to 4 Chat Starters (clickable topic suggestions). Then pick one of the 8 color presets or create a custom theme. Optionally configure a visual effect and teaser text to draw attention to the widget.
Admin Portal Overview
Layout
The Admin Portal is split into two panels:
- Left panel (Configuration) — Contains the tab bar and all configuration forms. This is where you edit your Guru's settings.
- Right panel (Preview) — A sticky panel showing a live preview of your chat widget, the theme switcher, and visual effects controls. Changes are reflected here in real-time.
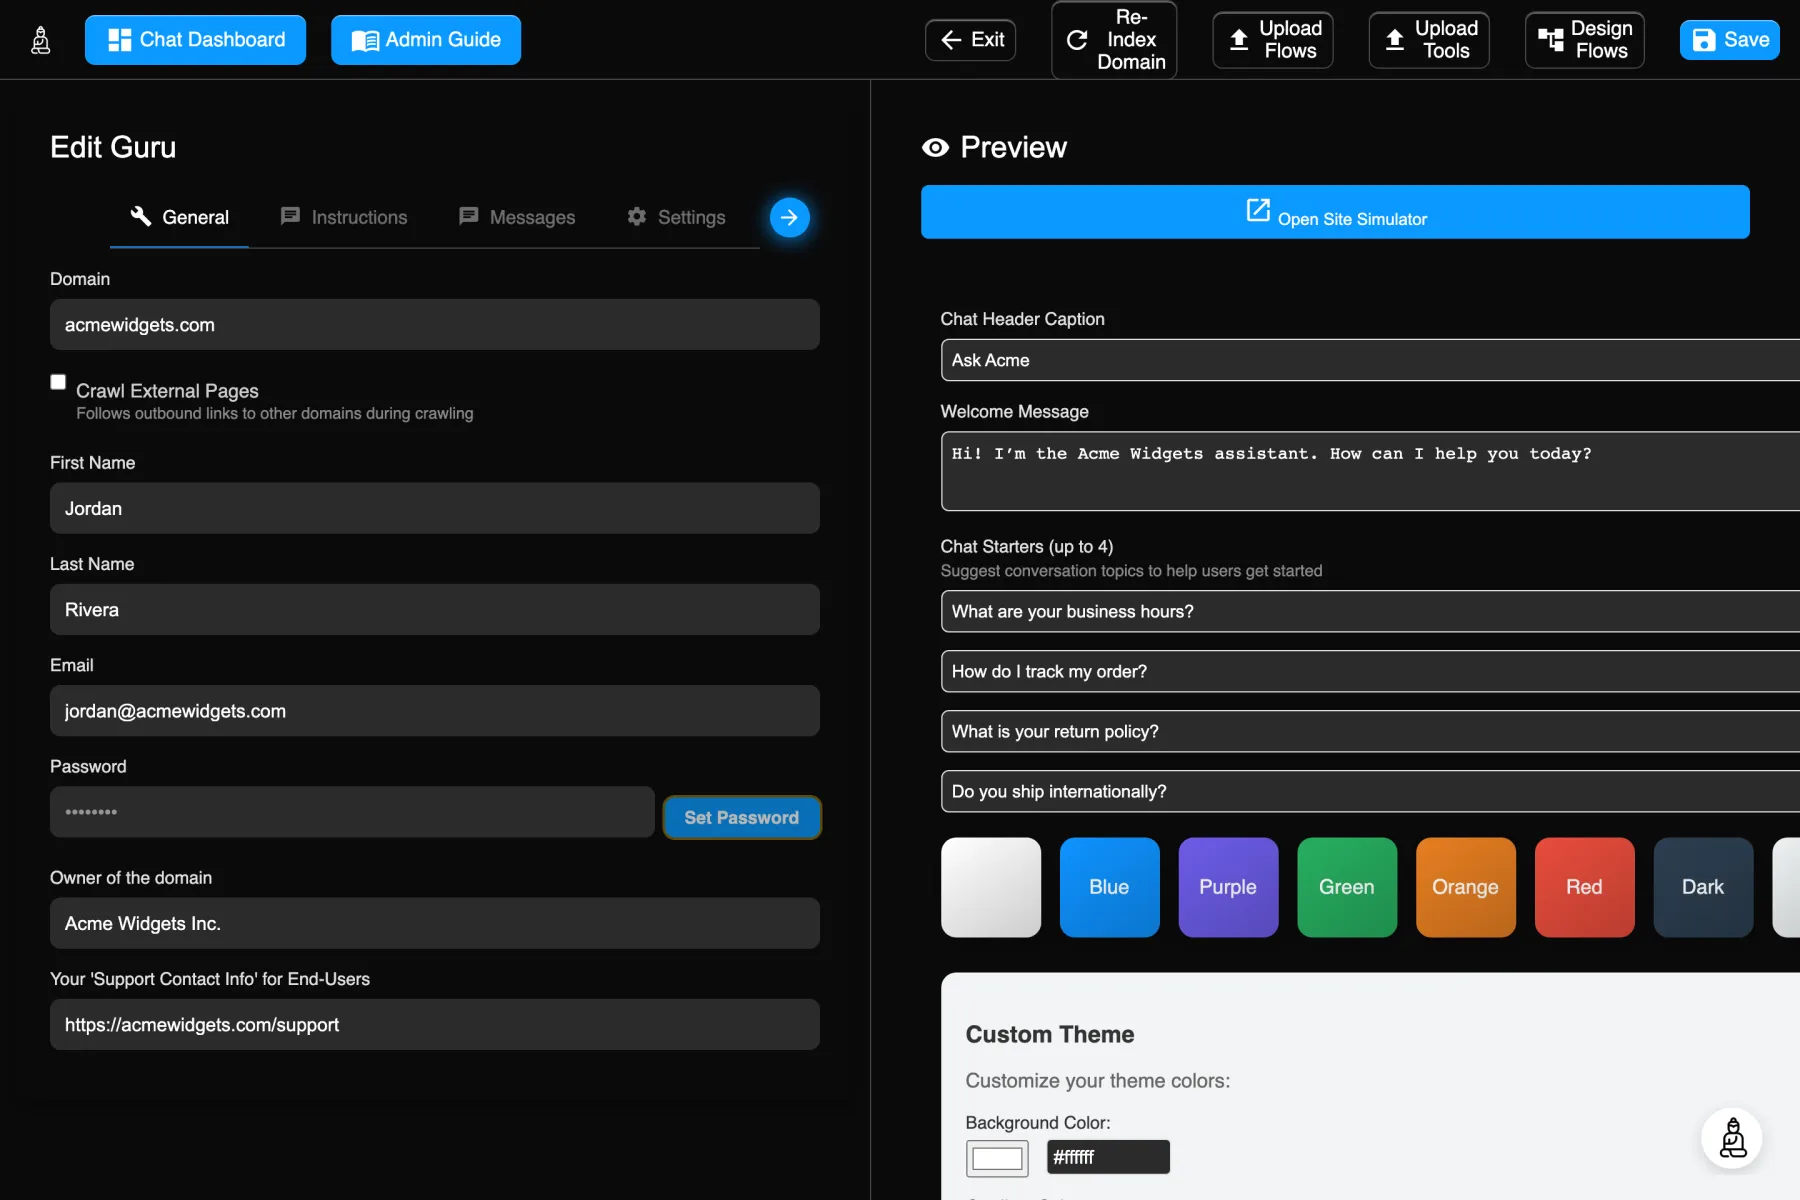
The navbar at the top provides quick actions:
| Button | Description |
|---|---|
| Chat Dashboard | Opens the Chat Dashboard in a new tab to view conversation logs and analytics. |
| Admin Guide | Opens this guide in a new tab. |
| Exit | Returns to the previous page. Warns you if there are unsaved changes. |
| Re-Index Domain | Triggers a re-crawl and re-index of your website content. See Re-Index Domain. |
| Upload Flows | Imports a JSON/.flows file of interactive conversation flows for the Guru. Visible only with the Admin or Config permission. |
| Upload Tools | Imports a JSON/.tools file of custom tool definitions the Guru can call. Visible only with the Admin or Config permission. |
| Design Flows | Opens the visual Flow Designer (flow-designer.html) in a new window to build and edit conversation flows interactively. Visible only with the Admin or Config permission. |
| Save | Saves all changes. Glows orange when there are unsaved modifications. |
Saving Changes
The Save button in the top-right corner glows orange whenever you have unsaved changes. When you click Save, the system performs a 3-way merge check:
- It compares the configuration as it was when you loaded the page (the original).
- It compares your changes (your modifications).
- It fetches the latest version from the server to detect if another user made changes since you loaded.
If another user modified the same fields, a conflict resolution dialog appears, letting you choose between the original value, your value, or the other user's value for each conflicting field.
Permission-Based Access
Not all tabs are visible to every user. An administrator assigns permissions to each user account (see Users Tab). The tabs you see depend on the permissions granted to your account. Only users with the Admin permission can see all tabs and manage other users.
General Tab
The General tab contains your account information, domain ownership details, and the support contact shown to your end-users.
Account Information
| Field | Type | Description |
|---|---|---|
| Domain | read-only | Your website domain. This is set during onboarding and cannot be changed. |
| Configuration Name | read-only | Shown only when the configuration name differs from the domain (e.g., for multi-config setups). Identifies which configuration file is active. |
| First Name | text | Your first name for the account. |
| Last Name | text | Your last name for the account. |
| read-only | Your login email. To change it, use the Modify Email/Password button. | |
| Password | read-only | Shown as dots. To change it, click the Modify Email/Password button, which opens a secure dialog where you enter your current password, then set a new password (minimum 6 characters) and optionally a new email. |
| Crawl External Pages | checkbox | When enabled, the crawler follows outbound links to other domains while indexing your site — useful if your knowledge base spans linked external pages. Leave it off to restrict crawling to your own domain. Takes effect on the next Re-Index. |
Owner & Support Contact
| Field | Type | Description |
|---|---|---|
| Owner of the domain | text | Your company or organization name. Used for identification purposes in the system. |
| Your 'Support Contact Info' for End-Users | text | A URL or contact information (e.g., https://support.example.com or an email address) that is automatically appended to error and fallback messages shown to your end-users. This ensures visitors always know how to reach human support when the AI cannot help. |
Instructions Tab
This is where you define your Guru's identity, expertise, and purpose. These instructions shape how the AI assistant behaves and responds to your visitors.
Guru Identity & Purpose
| Field | Type | Description |
|---|---|---|
| Guru Name | text | The display name of your AI assistant (e.g., "SalesBot", "HelpDesk Pro", "Maya"). This name appears in the chat widget header and is how the assistant refers to itself. |
| Tell your Guru who he/she is and his/her skills | textarea | Define the identity and expertise of your Guru. Example: "You are an AI assistant for Example.com, expert in sales and customer service, fluent in English and Spanish." This sets the personality, tone, and knowledge domain of the assistant. |
| Tell your Guru what it is tasked with | textarea | Define the primary job and use case. Example: "Help users find information about our products and services. Guide them through the purchasing process and answer questions about pricing, shipping, and returns." This focuses the assistant on its core responsibilities. |
Advanced Prompt Engineering
These optional fields give you fine-grained control over the AI's internal processing pipeline. Most users do not need to modify these — the defaults work well for standard use cases.
| Field | Type | Description |
|---|---|---|
| Prompt Analysis Notes | textarea | Custom instructions for the prompt evaluation step. This controls how the user's question is analyzed and rephrased to optimize document retrieval. Leave blank to use default behavior. |
| Evaluate Reference Documents Notes | textarea | Custom instructions for the document evaluation process. This controls how retrieved documents are scored and selected for inclusion in the response. Leave blank to use default behavior. |
| Generate Response Notes | textarea | Custom instructions for the response generation step. This influences the final answer composition, including style, format, and content guidelines. Leave blank to use default behavior. |
Messages Tab
Configure the error and fallback messages your Guru displays to end-users. (The Welcome Message and Chat Starters have moved to the Preview Panel for easier visual configuration.)
Error Message Prefix
| Field | Type | Description |
|---|---|---|
| Apology Word | text | The word that precedes all error/fallback messages below (e.g., Sorry, Apologies, Oops). This ensures a consistent, polite tone across all error states. |
Error & Fallback Messages
Each message below is shown to end-users when a specific error condition occurs. They are automatically preceded by the Apology Word and followed by your Support Contact Info (from the General tab).
| Field | Condition |
|---|---|
| Document Not Found Message | No relevant documents matched the user's query in the knowledge base. |
| Timeout Message | The request took too long to process. |
| Invalid URL Message | The AI's response contained a URL that failed validation and was rejected. |
| Empty Response Message | The AI returned an empty response. |
| Truncated Response Message | The AI's response was cut short due to length constraints. |
| System Unavailable Message | The backend system is temporarily unreachable. |
| Error Message | A general processing error occurred. |
| Nested Error Message | An error occurred while handling another error. Followed by technical error information (instead of Support Contact Info). |
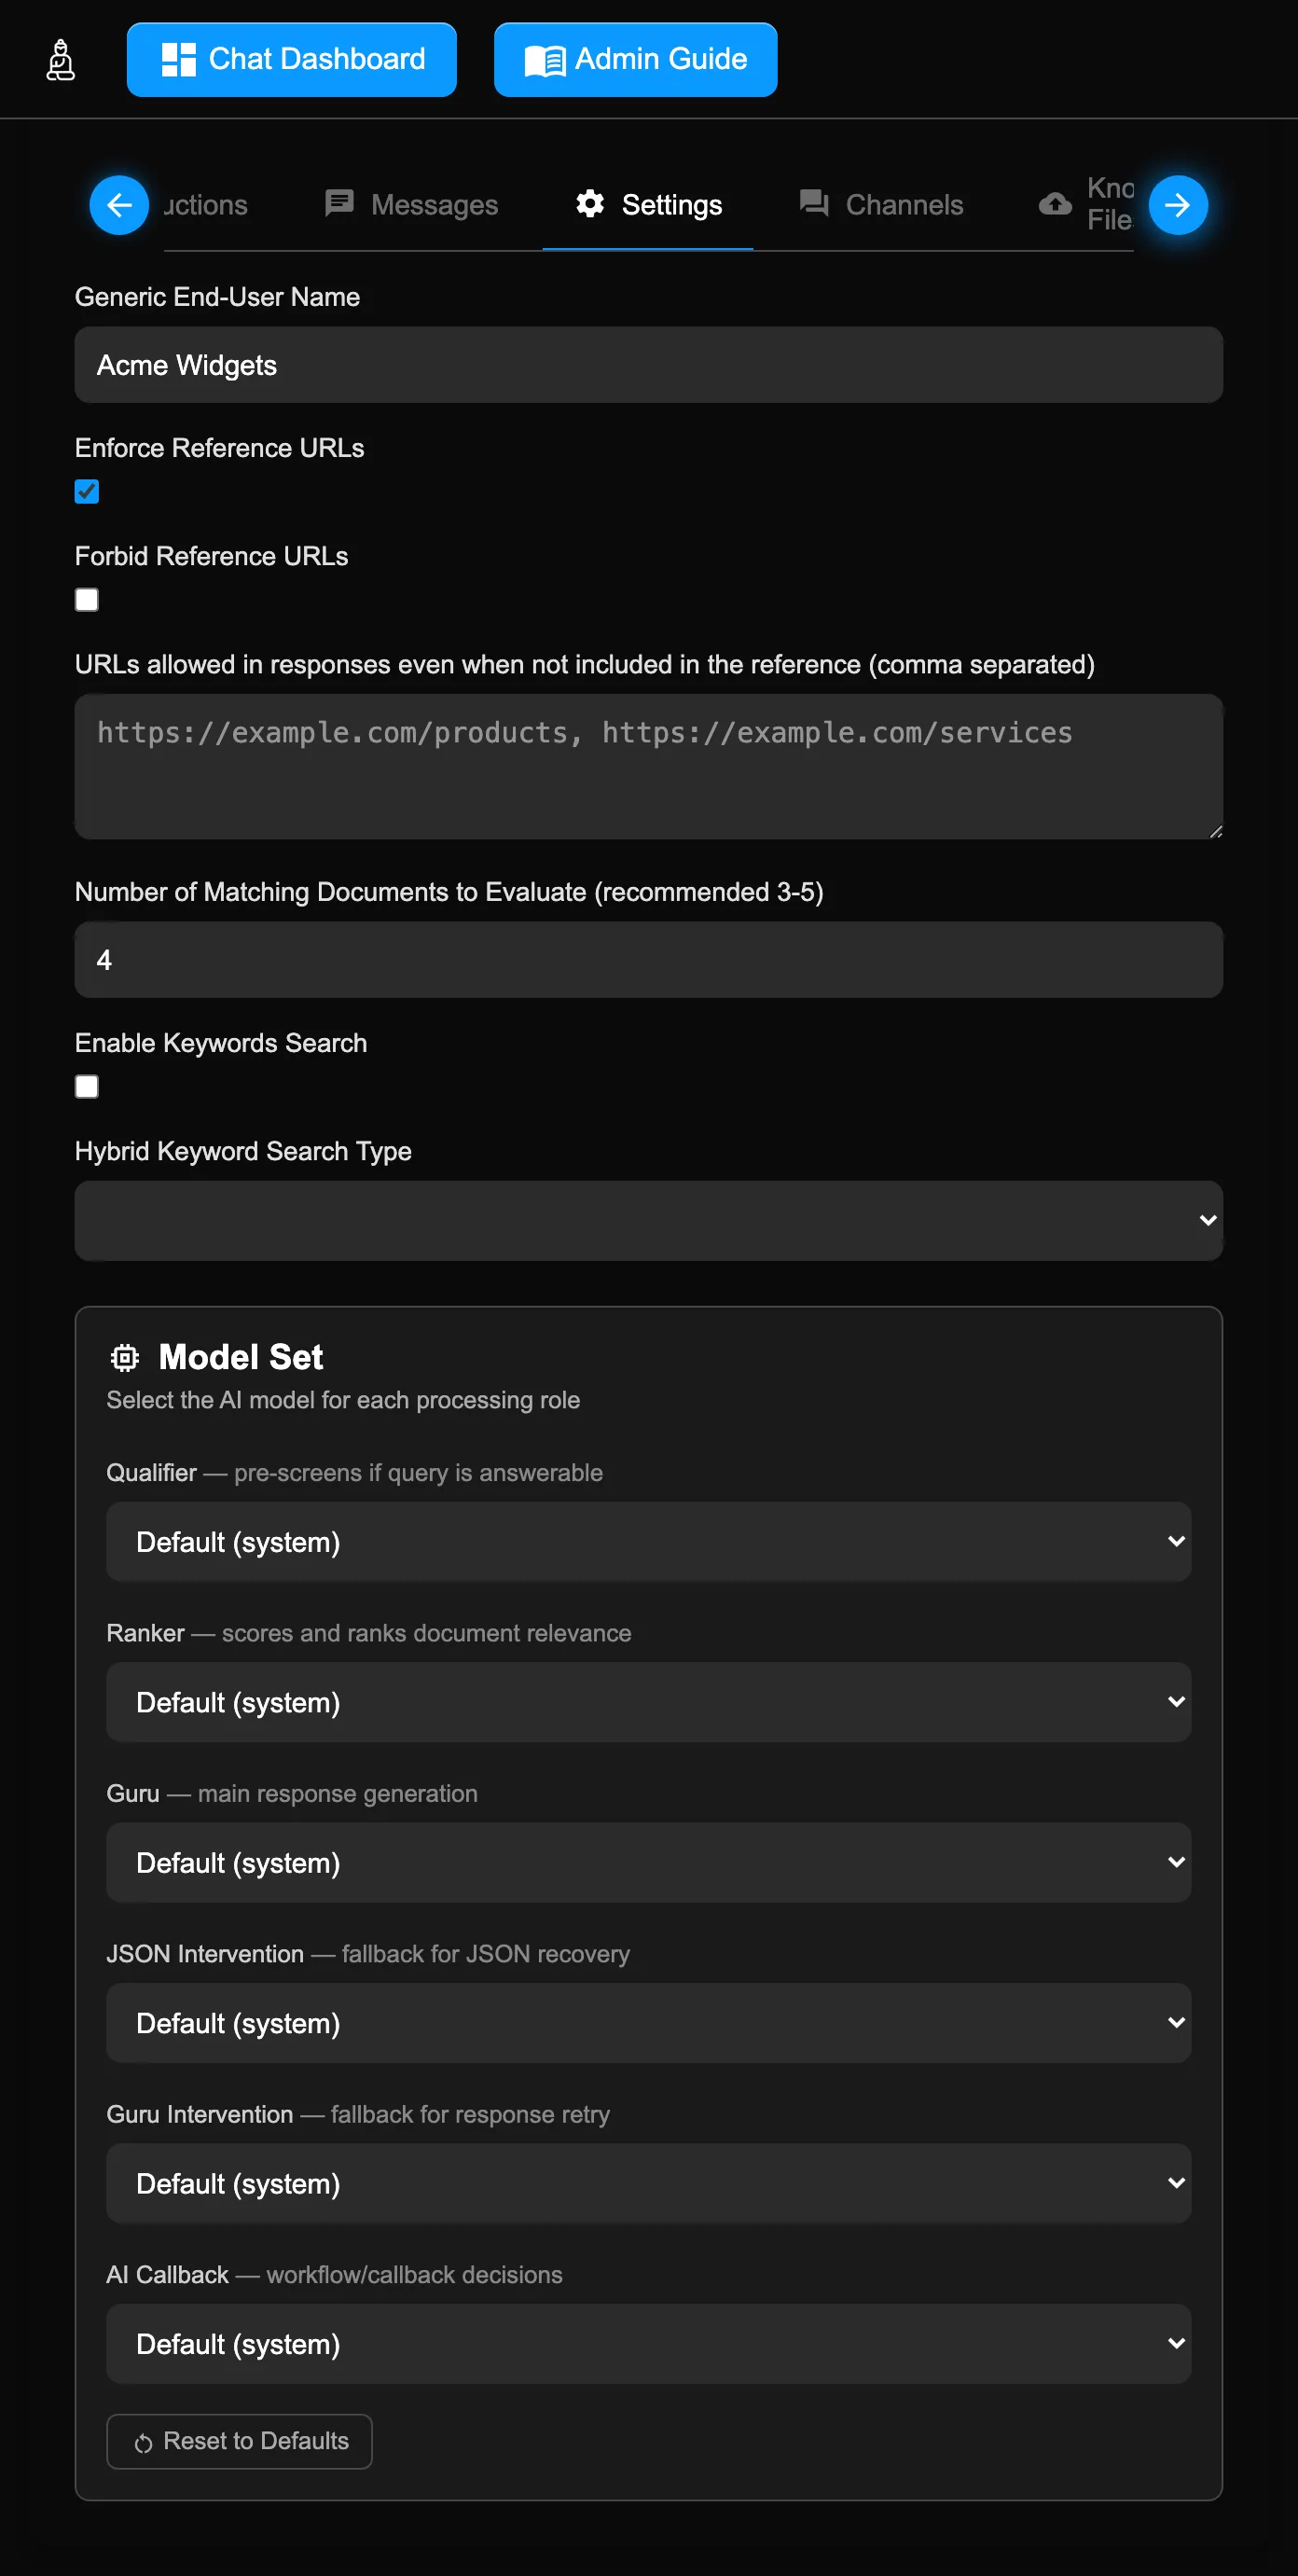
Settings Tab
Fine-tune how your Guru retrieves information and interacts with users.
| Field | Type | Description |
|---|---|---|
| Generic End-User Name | text | How end-users are referred to when their name is not known (e.g., Site Visitor, Customer, Guest). Used in greetings and conversation context. |
Reference URL Controls
| Field | Type | Description |
|---|---|---|
| Enforce Reference URLs | checkbox | When checked, the AI is required to include source URLs in its responses. This increases transparency but may make answers more verbose. |
| Forbid Reference URLs | checkbox | When checked, the AI is prevented from including any source URLs in responses. Useful when you want cleaner, more conversational answers. |
| URLs allowed in responses | textarea | A comma-separated list of URLs the AI may reference even when they are not found in the retrieved documents. Useful for linking to your pricing page, contact form, or other important pages. |
Search Settings
| Field | Type | Description |
|---|---|---|
| Number of Matching Documents to Evaluate | number (1–10) | How many documents are retrieved from your knowledge base for each query. Recommended: 3–5. Higher values may improve accuracy for complex questions but increase response time. This field is required: if it is empty or outside 1–10, Save is blocked and the form jumps to this field for correction. |
| Enable Keywords Search | checkbox | Enables hybrid search that combines semantic (meaning-based) search with traditional keyword matching. Can improve results when users search for specific terms, product names, or codes. |
| Hybrid Keyword Search Type | select | Only relevant when Keywords Search is enabled. should = keyword matches boost relevance (recommended). must = results must contain the keywords (more restrictive). |
Chat Starters have moved to the Preview Panel for easier visual configuration.
Model Set
The Model Set editor lets administrators override which AI model is used for each processing role. By default, all roles use Default (system) — centrally managed defaults that are optimized and updated automatically for best results.
| Role | Type | Description |
|---|---|---|
| Qualifier | select | Pre-screens whether a user query is answerable from your knowledge base. |
| Ranker | select | Scores and ranks retrieved documents by relevance to the query. |
| Guru | select | The main model that generates the final response shown to your visitors. |
| JSON Intervention | select | Fallback model used for JSON recovery when the primary model returns malformed output. |
| Guru Intervention | select | Fallback model used to retry response generation when the primary attempt fails. |
| AI Callback | select | Model used for workflow and callback decisions. |
Each dropdown lists available models grouped by provider (Anthropic, OpenAI, Google, Amazon, Meta, DeepSeek). The first option is always Default (system), which delegates the choice to the platform’s centrally managed defaults.
Click Reset to Defaults beneath the model selects to return all roles to Default (system).
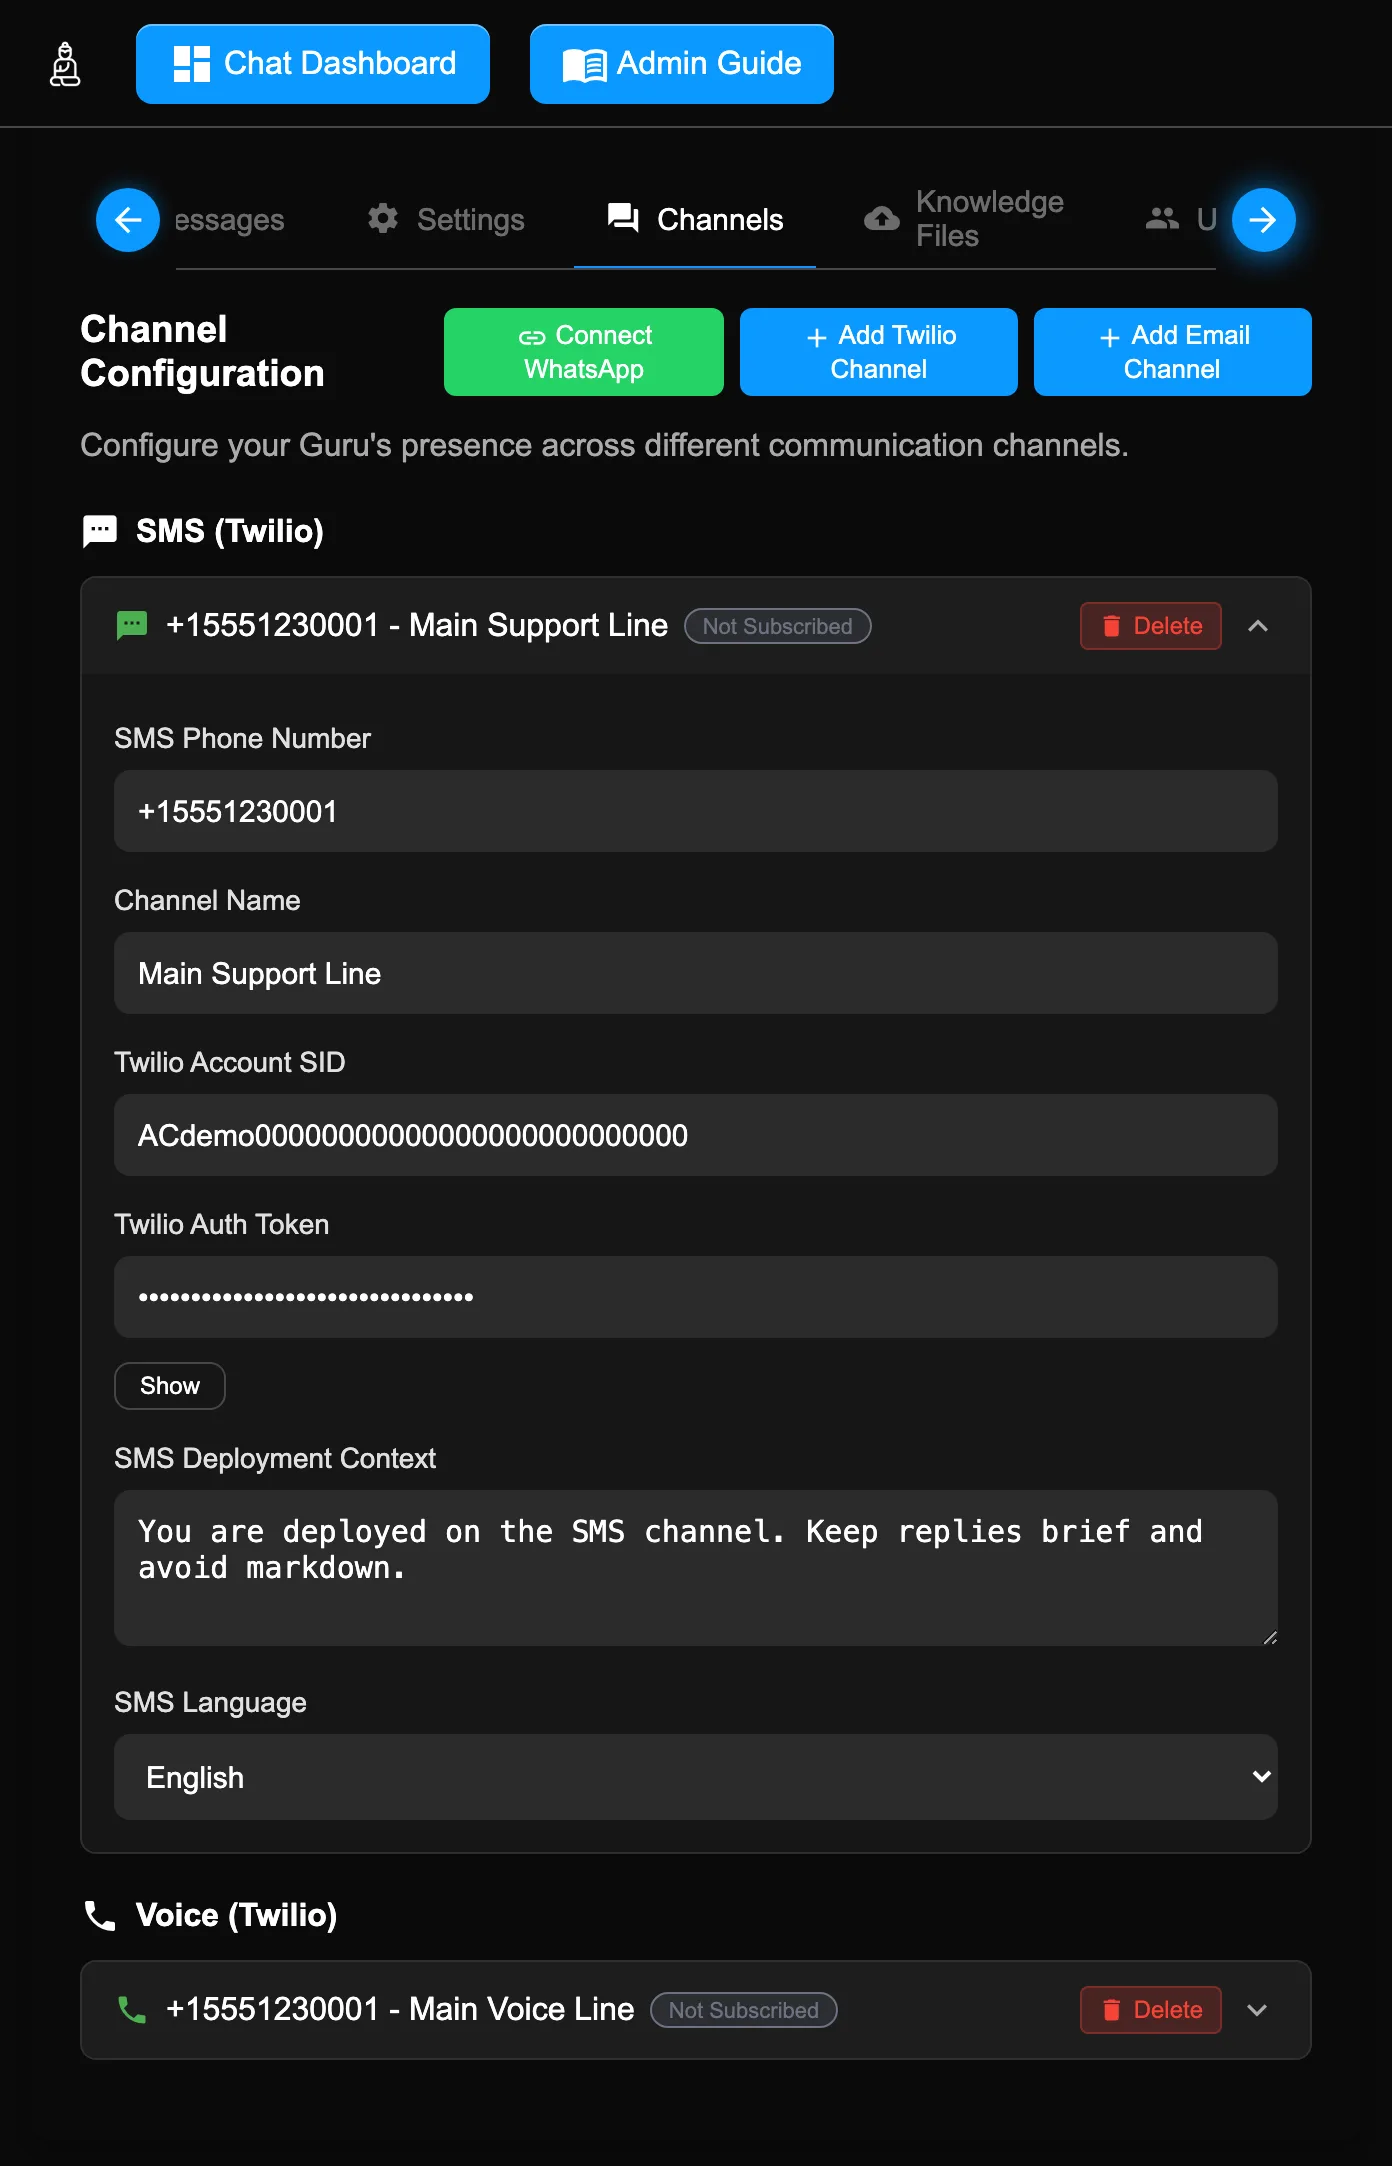
Channels Tab
Extend your Guru beyond the web widget by connecting WhatsApp, SMS, Voice, and Email channels. Each channel type has its own section with dedicated configuration.
Every channel card — WhatsApp, SMS, Voice, or Email — behaves the same way:
- Click the card header to expand or collapse it.
- Delete button (trash icon) in the header removes the channel.
- A “Configuration Required” banner appears when a channel was added from your subscription but is still missing credentials — fill in the highlighted fields to activate it.
- An “Activate Billing” button and a subscription badge appear on channels that aren’t yet billed; see the Subscription tab for how channels are counted.
- Any secret field (Auth Token, Business Token, etc.) has a “Show” button to reveal the stored value so you can verify or copy it.
WhatsApp Channels
WhatsApp Business uses Meta's Embedded Signup flow. Once your Meta prerequisites are in place, connecting an existing WhatsApp Business Account (WABA) to your Guru is a 3-screen popup launched from the Connect WhatsApp button in the Channels tab.
Meta Prerequisites (outside our admin)
Before clicking Connect WhatsApp, you must already have:
- Verified Meta Business Portfolio — set up in Meta Business Manager. Business verification typically takes 1–3 days.
- WhatsApp Business Account (WABA) created inside that Business Portfolio.
- Verified WhatsApp phone number attached to the WABA. Meta sends a one-time code via SMS or voice call to confirm ownership of the number.
References:
Connect via Embedded Signup
In the Channels tab, click Connect WhatsApp. Meta's Embedded Signup popup opens on facebook.com. There are up to four screens:
- Facebook login — if you are not already signed into Facebook in this browser, the popup prompts you to log in to the Meta account that owns your Business Portfolio. Skipped if you are already signed in.
- Welcome — confirms what Cloud API will let you do (send and receive at scale, securely). Click Continue.
- Select assets — pick your Business portfolio and WhatsApp Business account from the dropdowns. Click Next.
- Confirm phone number — Meta surfaces the verified phone number attached to your WABA and asks you to authorize assigning it to the InstantAI Guru application. Confirm.
Meta then hands the connection back to our app. A new WhatsApp channel card appears in your Channels tab with these fields:
| Field | Type | Description |
|---|---|---|
| WhatsApp Phone Number | read-only | The WhatsApp phone number from Facebook signup. |
| Channel Name | text | A friendly name for this channel (e.g., "Main Support Line"). |
| WhatsApp Phone Number ID | read-only | Facebook API identifier. |
| WhatsApp Business Account ID (WABA) | read-only | WhatsApp Business Account ID. |
| Business ID | read-only | Facebook Business ID. |
| Business Token | read-only | Authentication token (masked — use Show to reveal). |
| WhatsApp Custom Greeting | textarea | A channel-specific welcome message for WhatsApp conversations. |
| WhatsApp Deployment Context | textarea | Additional context telling the Guru it is deployed on WhatsApp (e.g., formatting guidance, brevity preferences). |
Meta bills WhatsApp Business Cloud API per message (charged on delivery, not send), with rates varying by recipient country and message category:
| Category | What it covers | Cost |
|---|---|---|
| Marketing | Promotional content, offers, cart reminders | Paid |
| Utility | Order confirmations, delivery updates — triggered by a customer action | Free when customer-triggered, otherwise paid |
| Authentication | One-time passwords (OTP) | Paid |
| Service | Replies to customer inquiries | Free |
Messages sent within 72 hours of a customer clicking a "Click-to-WhatsApp" ad or Page CTA are free regardless of category. See Meta's current pricing for region-specific rates.
Twilio Setup (Required for SMS & Voice)
Both SMS and Voice channels run through Twilio. You bring a Twilio phone number plus your Twilio credentials, and your Guru handles inbound texts and calls on that number. One Twilio number serves both channels — SMS via the Messaging webhook, Voice via the Voice webhook. Twilio bills you separately for the number, messages, and minutes; your subscription with us covers the AI handling on top.
Step 1: Sign Up & Buy a Number
If you don’t already have a Twilio account, sign up at twilio.com/try-twilio. The trial gives you a free number; you’ll need to upgrade to a paid account before registering for A2P 10DLC (required for SMS).
To buy a number: in the Twilio Console, go to Products & Services → Numbers & Senders → Phone Numbers → Buy a Number. Filter by country and capabilities — you’ll want both SMS and Voice enabled. US local long-code numbers are the most common choice. Toll-free numbers ship faster for SMS but cost more per message.
Reference: Twilio: How to Buy a Phone Number
Step 2: Configure Webhooks
Once you own a number, configure it to send inbound calls and messages to InstantAI Guru. In the Console, click your number and open the Configure tab.
| Twilio Section | Field | Value |
|---|---|---|
| Voice and emergency calling | A CALL COMES IN | Webhook — https://api.instantaiguru.com/v1/twilioVoice, HTTP POST |
| Messaging | A MESSAGE COMES IN | Webhook — https://api.instantaiguru.com/v1/twilioSMS, HTTP POST |
Save the configuration. Your number is now live for Voice immediately — inbound calls to that number will be answered by your Guru. SMS requires one more step.
https://api-dev.instantaiguru.com/v1/twilioVoice and https://api-dev.instantaiguru.com/v1/twilioSMS. The exact URLs are also displayed in the Add Twilio Channel modal in the admin Channels tab.
References: Voice Webhooks · Messaging Webhooks
Step 3: A2P 10DLC Registration (SMS Only)
Mobile carriers (T-Mobile, AT&T, Verizon) gatekeep all outbound application-to-person SMS in the US to reduce spam. To send SMS from your Twilio number, you must register a Brand and a Campaign through Twilio’s A2P 10DLC program before your messages will deliver. Voice is unaffected — there is no equivalent carrier-trust layer for phone calls.
In the Twilio Console, go to Messaging → Regulatory Compliance. The wizard walks you through these steps in order:
- Customer Profile — legal business name and address.
- Brand Registration — submit company identity for vetting. Approved separately before Campaign.
- Campaign Registration — describe how you’ll use SMS: use-case category, 2–5 sample messages, opt-in flow, opt-out keywords. Privacy Policy URL and Terms of Service URL are required (and become a hard requirement on June 30, 2026).
- Number Assignment — attach your purchased number to the approved campaign.
References:
Sole Proprietor vs Standard Path
Twilio routes your registration into one of two paths based on a single question on the Brand form: “Does your company have a business registration number?” (Tax ID — EIN in the US, Canadian Business Number in Canada).
| Answer | Path | Eligibility | Brand Approval | Limits |
|---|---|---|---|---|
| Yes, with Tax ID | Standard (or Low-Volume Standard if <6,000 segments/day) | US with EIN, Canada with CBN, or business HQ outside US/CA/EU/UK/AU | 1–3 days (TCR vets the brand) | Multiple numbers per campaign; throughput scales with TCR Trust Score |
| No, no Tax ID | Sole Proprietor | US or Canadian address; taxes filed under SSN/SIN | Minutes (SMS OTP — respond within 24 hours) | One phone number per campaign. Lower throughput cap. |
Approval Timing
Real-world experience for most customers: Campaign approval typically lands in 2 to 3 days, sometimes faster, occasionally up to a week. Brand approval is much faster — minutes for Sole Proprietor (OTP), 1–3 days for Standard (TCR vetting).
Plan accordingly:
- Voice is live the moment you save the webhook configuration. You can answer calls immediately.
- SMS will accept inbound messages, but will not deliver outbound until your Campaign is approved. Submit your Brand and Campaign as early in your onboarding as possible.
Step 4: Copy Credentials & Add the Channel
Once your number is purchased and the webhooks are configured (and A2P is submitted, if you plan to send SMS), come back to the InstantAI Guru admin to record your Twilio details.
- In the Twilio Console homepage, find the Account Info widget. It shows your Account SID and Auth Token side by side. Click Show on the Auth Token row to reveal it, then copy both values.
- In the admin Channels tab, click Add Twilio Channel.
- Paste your phone number (E.164 format, e.g.,
+15551234567), Account SID, and Auth Token into the modal. Keep both SMS and Voice checkboxes enabled if your number supports both. - Click Add Channel. The channel is provisioned and saved.
SMS Channels
Prerequisite: complete Twilio Setup first. Click Add Twilio Channel to configure an SMS channel via Twilio. You will be prompted for the phone number, Account SID, and Auth Token.
| Field | Type | Description |
|---|---|---|
| SMS Phone Number | read-only | The Twilio phone number for SMS. |
| Channel Name | text | A friendly name for this channel. |
| Twilio Account SID | text | Your Twilio Account SID. |
| Twilio Auth Token | password | Your Twilio Auth Token. Use the Show button beneath the field to reveal the stored value so you can verify or copy it. |
| SMS Deployment Context | textarea | Context for SMS deployment (e.g., "Keep responses brief, avoid markdown"). |
| SMS Language | select | Language for this channel: English, Spanish, French, German, Italian, or Portuguese. |
Voice Channels
Prerequisite: complete Twilio Setup first. Voice channels are also added via the Add Twilio Channel button (with the Voice checkbox enabled). They include all SMS fields plus these additional settings:
| Field | Type | Description |
|---|---|---|
| Live Agent Phone Number | text | The phone number to transfer callers to when they request a live agent. |
| Intercept Live Agent Message | textarea | A message played before transferring to a live agent (e.g., "Hello, I'm the Virtual Operator. I see you've requested a live agent. Before I transfer you, our Virtual Agent is available right now, and It can instantly guide you through most issues. Would you like to return to our Virtual Agent? To return back to the virtual agent for immediate assistance just say yes If you still prefer to speak with a live agent, just say no, and I will route you to the queue."). |
| Live Agent Service Hours | schedule | A weekly schedule defining when the live agent is available to receive transfers. See details below. Only appears once a Live Agent Phone Number is set. |
| Voice Language | select | The language used by the virtual agent on this channel: English, Spanish, French, German, Italian, or Portuguese. |
| Voice Websocket Vendor | select | The text-to-speech provider: Amazon, Google, or ElevenLabs. |
| Voice Name | text | The specific voice identifier for the selected vendor (e.g., Pedro-Neural for an Amazon Polly voice, or an ElevenLabs voice ID). |
Like the SMS card, the Voice card’s Twilio Auth Token field has a Show button to reveal the stored value. The card also includes the Channel Name, Twilio Account SID, Twilio Auth Token, and Voice Deployment Context fields shared with SMS, plus a Voice Custom Greeting.
Live Agent Service Hours
The Live Agent Service Hours editor lets you define when the live agent is available to receive transferred calls. It appears in the Voice channel card as soon as you enter a Live Agent Phone Number and is hidden when the phone number is cleared.
| Control | Description |
|---|---|
| Timezone | The timezone used to interpret the schedule. Defaults to the browser’s detected timezone. All available IANA timezones are listed. |
| Days (Mon–Sun) | Each day has its own row. A day with no ranges is treated as closed — no calls are transferred to the live agent on that day. |
| + add hours | Adds a new time range to that day. Select an open and close time from 30-minute slots spanning 00:00–23:30. |
| × (remove) | Removes a specific time range from the day. |
09:00–12:00 and 13:00–17:00).
Email Channels
Email channels let your end-users email questions to your Guru at a dedicated address. The AI generates a contextual reply with proper RFC threading headers (so it lands in the original email thread in their inbox) and an automatic AI-disclosure footer (required for compliance with California's BOT law and the EU AI Act).
Add an email channel via the Add Email Channel button at the top of the Channels tab. Unlike Twilio channels, no external account is needed — the address is provisioned instantly. You may add multiple email channels per Guru (e.g., one for general support, one for sales, one for billing) by setting different Department values.
| Field | Type | Description |
|---|---|---|
| Department | text | Optional namespace for multi-channel customers. Leave empty for the default channel. Examples: sales, support, billing. The full slug becomes [department.]your-domain (e.g., sales.acmewidgets.com). |
| Inbound Address | read-only | The dedicated email address for this channel, auto-computed as <slug>@inbox.instantaiguru.com. Updates live as you edit the Department field. End-users either email this address directly, or you set up a forwarder from your real address (e.g., [email protected]) to this address. |
| Channel Name | text | A friendly label for this channel (shown in the card header for your own reference). Example: "Customer Support". |
| Reply From Name | text | The display name used in the From: header on outbound replies. Defaults to your domain name (e.g., acmewidgets.com). Customize to something like "Acme Support" for a polished customer-facing identity. |
| Email Deployment Context | textarea | Optional channel-specific instructions for the AI when handling email. The default text reminds the AI that emails are asynchronous and to use clear paragraphs and explicit URLs (avoiding "click here" phrasing). |
| Forwarding Source | text | Informational field — the address you're forwarding from (e.g., [email protected]). Used as a reminder of the setup pattern; the actual forwarding is configured in your email provider. |
| Additional Footer | textarea | Optional customer-defined text appended to every reply after the platform's required AI-disclosure footer. Useful for company tagline, support hours, or links to documentation. |
Setup Pattern
Most customers don't change their public-facing email address. The recommended pattern is to forward mail from your existing support address to the channel's inbound address:
- End-users continue to email
[email protected]as usual. - You configure your email provider (Google Workspace, Microsoft 365, etc.) to forward all
support@mail to[email protected]. - The AI receives the forwarded copy and replies on your behalf, with the original sender as the recipient.
inbox.instantaiguru.com address — their mail client shows the reply as coming from your branded Reply From Name, threaded under the original conversation.
Built-In Features
| Feature | Behavior |
|---|---|
| RFC threading | Replies include In-Reply-To and References headers, so they thread under the original conversation in Gmail, Outlook, Apple Mail, etc. |
| AI disclosure footer | Every reply automatically includes a brief disclosure ("This is an AI-assisted reply …") for compliance. Customers may add their own additional footer but cannot remove the platform disclosure. |
| STOP keyword detection | If a sender replies with STOP, UNSUBSCRIBE, REMOVE, or similar phrases (industry-standard set), they are immediately added to the suppression list. A brief acknowledgment is sent and no future replies are generated. |
| List-Unsubscribe header | Every reply includes the RFC 2369 List-Unsubscribe header pointing to mailto:[email protected]. Major mailbox providers surface this as a one-click unsubscribe button next to the sender name. |
| Reply-all with safeguards | If the original email has Cc'd recipients, the AI's reply preserves them — with safeguards. Suppressed addresses, mailing-list bounces (noreply@, mailer-daemon@, etc.), and own-domain addresses are stripped to prevent loops and unintended amplification. |
| Bounce & complaint suppression | If a recipient's mailbox bounces, or they mark a reply as spam, that address is automatically suppressed account-wide. Future replies to that address are not sent. |
Branded From Address (optional)
By default, replies are sent From: the channel's inbound address (<slug>@inbox.instantaiguru.com). For a polished customer-facing experience you may instead send replies from your own domain (e.g., [email protected]). There is no toggle — simply type the address into the channel's From Address field and click Verify Domain. A live status badge next to the field shows whether the domain is verified yet, updating as you type.
The verify modal shows four DNS records you must add to your domain's DNS host (Cloudflare, Route 53, GoDaddy, etc.):
- Three CNAME records — DKIM signing keys. These prove that mail signed with the matching private key really came from us, on your behalf. Each is a separate, additive record. Cloudflare users: set proxy status to DNS only (gray cloud) on all three.
- One TXT record — the SPF record (see the warning below).
SPF allows exactly one TXT record per hostname (RFC 7208). If a receiver finds two TXT records on the same name that both begin with v=spf1, SPF authentication fails with a PermError and your mail is rejected or sent to spam — for every sender, not just the new one. Different subdomains can each have their own SPF; it's only multiple records on the same name that break things.
The verify modal asks you to add an SPF record on your apex domain (e.g., yourdomain.com with no subdomain). If you already have an apex SPF (likely — Google Workspace, Microsoft 365, MXroute, Mailchimp, etc. all add one), do not add the SES record as a second TXT. Instead, edit the existing apex SPF and append include:amazonses.com before the closing -all or ~all.
Example merge:
| Existing apex SPF | After merge |
|---|---|
v=spf1 include:_spf.google.com -all | v=spf1 include:_spf.google.com include:amazonses.com -all |
v=spf1 include:mxroute.com -all | v=spf1 include:mxroute.com include:amazonses.com -all |
| (no existing record on apex) | v=spf1 include:amazonses.com -all |
To check what you have, run dig +short TXT yourdomain.com and look for the line starting with v=spf1. Whatever's there is your existing apex record — merge into it; never create a second.
Note on -all vs ~all: Keep whichever your existing record uses. -all is a hard fail (reject non-listed senders), ~all is a soft fail (mark as suspicious but still deliver). Mixing them across merges doesn't matter; what matters is that the merged record stays a single line per hostname.
SPF and DKIM are independent layers of authentication, and they don't share the "one record only" constraint. SPF is a single TXT record on the apex domain authorizing approved senders. DKIM uses one CNAME per signing key, so multiple email services on the same domain coexist cleanly — SES adds three CNAMEs without affecting any DKIM records your other services have already created.
After the records propagate (typically 5–30 minutes), click Check Status in the verify modal. Once verification succeeds, save the channel configuration to activate sending from the branded address. If you skip the verification or it fails, the channel falls back to the default inbox.instantaiguru.com From address — you do not lose service.
Knowledge Files Tab
Upload supplementary documents to expand your Guru's knowledge beyond what it learned from crawling your website. This is useful for product catalogs, FAQ documents, internal policies, or any content not available on your public website.
| Action | Description |
|---|---|
| Upload File(s) | Select one or more files to upload. Supported formats depend on your plan. |
| Upload Folder | Upload an entire folder of files at once (preserves folder structure). |
| Upload Files (button) | Starts the upload process. A progress bar shows the upload status. Files are uploaded directly to secure cloud storage. |
| Refresh | Reloads the file list from the server to see the latest state. |
| Delete Selected | Removes the checked files from your knowledge base. |
The file table displays all uploaded files with columns for Name, Size (KB), and Last Modified. Click any column header to sort. Use the checkboxes to select files for deletion.
Users Tab
Manage who can access and configure your Guru. Only users with the Admin permission can see this tab.
Managing Users
- Add User (+) — Creates a new blank user card in edit mode. Fill in their details and permissions, then click Save User.
- Remove User (-) — Deletes the currently selected user (you cannot delete yourself).
- Edit a User — Double-click a user card to enter edit mode. A Save User and Cancel button will appear.
User Card Fields
| Field | Type | Description |
|---|---|---|
| First Name | text | Required. Minimum 2 characters, maximum 100. |
| Last Name | text | Optional. |
| Required. Must be unique across all users. Used as the login identifier. | ||
| Password | password | Only shown when creating a new user. Existing users show masked dots. |
Permission Checkboxes
Each permission controls access to a specific tab or feature:
| Permission | Grants Access To |
|---|---|
| Admin | Full administrative access — all tabs, user management, config download/upload. |
| Instructions | The Instructions tab (Guru identity and prompt settings). |
| Messages | The Messages tab (error and fallback messages). |
| Settings | The Settings tab (search, references, chat starters). |
| Knowledge Files | The Knowledge Files tab (upload/delete documents). |
| Re-index | The Re-Index Domain button in the navbar. |
| Chat Logs | The Chat Dashboard button in the navbar. |
| Channels | The Channels tab (WhatsApp, SMS, Voice). |
| Integrations | The Integrations tab (Shopify, etc.). |
| Config | Unlocks the Upload Flows, Upload Tools, and Design Flows navbar buttons (interactive flow/tool editing) and the Model Set editor on the Settings tab. |
Integrations Tab
Connect your Guru to third-party platforms to extend its capabilities.
Shopify Integration
Toggle the Shopify Enabled switch to reveal the Shopify configuration panel.
OAuth Connection (Recommended)
| Field | Type | Description |
|---|---|---|
| Client ID | text | From your Shopify App's API Credentials page. |
| Client Secret | password | From your Shopify App's API Credentials page. |
| Shop Domain | text | Your Shopify store domain (e.g., my-store.myshopify.com). |
| Connect Shopify | button | Initiates the OAuth authorization flow. After completing the flow, your Guru will have secure access to your Shopify store data. |
| MCP Endpoint | text | Optional custom MCP (Model Context Protocol) endpoint. Leave empty to use the default. |
| Admin API Version | text | The Shopify Admin API version to use. Default: 2025-01. |
Legacy Token Connection
Expand the Legacy Token section (collapsible) if you prefer to use a static admin API token instead of OAuth:
| Field | Type | Description |
|---|---|---|
| Admin Store | text | Your Shopify store subdomain (e.g., my-store). |
| Admin API Token | password | A Shopify Admin API access token (starts with shpat_). |
| Test Connection | button | Tests the connection using the provided credentials. |
Activating the Chat Widget on Your Storefront
If you installed the InstantAIGuru app from the Shopify App Store, the storefront chat widget is delivered as a theme app extension. After installation, you must enable the extension in your active theme before the widget appears on your storefront:
- In your Shopify admin, go to Online Store → Themes.
- Click Customize on your active (published) theme.
- In the theme editor's left sidebar, click the App embeds icon (puzzle-piece icon, near the bottom).
- Locate InstantAIGuru Chat Widget in the list and toggle it on.
- Click Save in the top-right corner.
The chat widget will now appear on every storefront page. To disable the widget, repeat these steps and toggle the embed off — no code changes required.
CSAT — Post-call Surveys
Automatically text or email a short customer-satisfaction survey link to the customer after a call. Responses are collected by a self-hosted, open-source CSAT app that you deploy once; this card connects your Guru to it and chooses how the link is delivered.
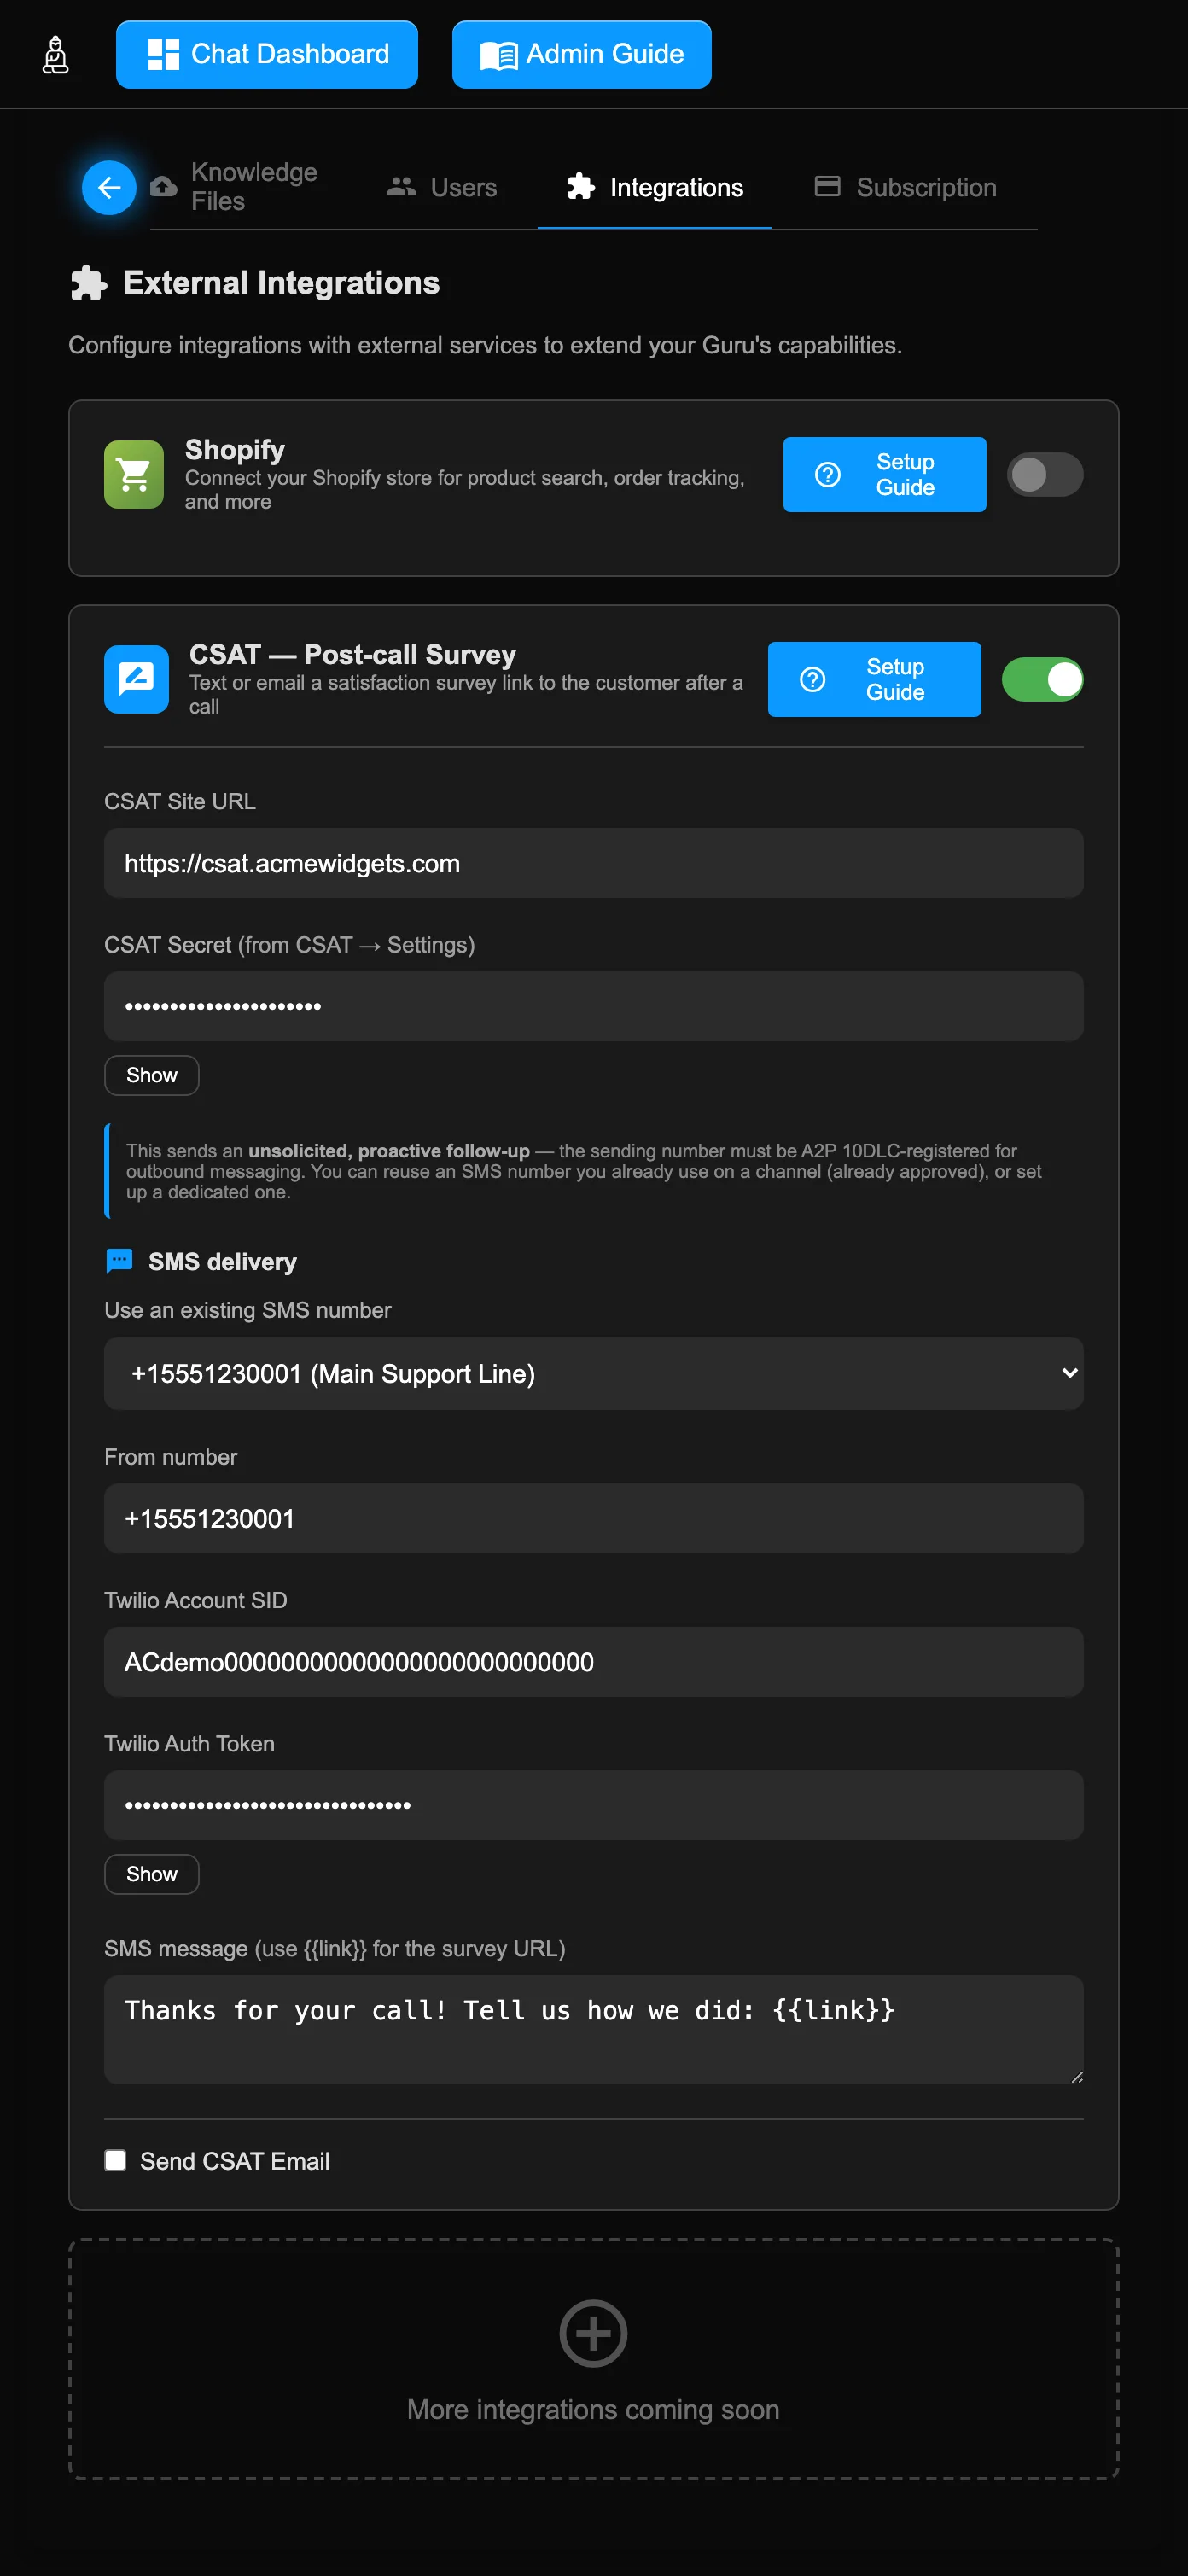
{{link}} placeholder for the survey URL.curl -fsSL https://raw.githubusercontent.com/ronpinkas/csat/main/install.sh | sudo shToggle CSAT — Post-call Survey on to reveal the configuration panel:
| Field | Type | Description |
|---|---|---|
| CSAT Site URL | text | Your CSAT deployment's public URL (e.g. https://csat.yourdomain.com). The survey link is built from this. |
| CSAT Secret | password | The token secret shown on the CSAT Settings page. It signs each survey link so your CSAT app accepts it. |
| Use an existing SMS number | select | Pick an A2P-approved number you already use on an SMS channel to auto-copy its credentials, or choose New dedicated number to enter one manually. |
| From number / Account SID / Auth Token | text | The Twilio number and credentials used to send the survey text. When you pick an existing number these are auto-filled and read-only (the values are copied from that SMS channel); choose New dedicated number to re-enable the fields and enter them manually. The Auth Token has a Show button to reveal the stored value. |
| SMS message | textarea | The text body. Use {{link}} where the survey URL should appear. |
| Send CSAT Email | checkbox | Also (or instead) deliver the survey by email. |
| Email Subject / Body | text | The email subject and body. Use {{link}} in the body for the survey URL. |
When the secret is set, the portal requires the CSAT URL and at least one delivery method — an SMS number (with its credentials) or the email option — before it will save.
Subscription Tab
View your current plan, usage statistics, and manage your subscription.
Usage & Plan Information
| Field | Type | Description |
|---|---|---|
| Indexed Pages | read-only | The total number of pages/documents currently indexed in your knowledge base. |
| Index Size | read-only | The total size of your search index (e.g., "2.4 MB"). |
| Your Plan | read-only | Your current subscription tier (e.g., Starter, Professional, Enterprise). |
| Expiration Date | read-only | When your current subscription period ends. |
| Status | read-only | Current subscription status (e.g., Active, Trial, Expired). |
| Next Renewal Date | read-only | When your next billing cycle begins. |
Billed Channels
Shows a breakdown of any additional channels (WhatsApp, SMS, Voice) that incur extra billing beyond your base plan.
Subscription Actions
| Button | Description |
|---|---|
| Subscribe | Shown when you have no active subscription. Opens the Stripe checkout form directly within the page. You can toggle between Monthly and Annual billing before subscribing. |
| Manage Subscription | Shown when you have an active subscription. Opens the Stripe Customer Portal where you can update payment methods, view invoices, or cancel. |
| Switch to Annual & Save 25% | Shown when you are on a monthly plan. Switches your billing cycle to annual at a 25% discount. |
Preview Panel (Appearance)
The right side of the Admin Portal shows a live preview of your chat widget. Changes are reflected here in real-time. This panel also contains the widget’s user-facing text fields — the header caption, welcome message, and chat starters — so you can see the result as you type.
Widget Text
| Field | Type | Description |
|---|---|---|
| Chat Header Caption | text | The text shown in the chat widget header bar (e.g., "Ask Our SalesBot"). If left empty, defaults to "Ask Our {Guru Name}". |
| Welcome Message | textarea | The first message displayed when a visitor opens the chat widget. Make it friendly and informative. Example: "Hello! I’m Maya, your AI assistant for Example.com. How can I help you today?" |
| Chat Starters (up to 4) | text × 4 | Clickable topic suggestions shown below the welcome message to help visitors start a conversation (e.g., "What are your business hours?"). Leave blank to hide. |
Site Simulator
Click Open Site Simulator to open a new browser window showing your actual website with the chat widget embedded. This lets you see exactly how the widget looks and behaves on your live site.
Theme Switcher
Choose from 8 preset color themes or create your own custom theme:
| Preset | Primary Color | Style |
|---|---|---|
| Clean | #0e92ff | Bright blue — professional, modern look. |
| Blue | #1a73e8 | Google-style blue — familiar, trustworthy. |
| Purple | #7c3aed | Rich purple — creative, premium feel. |
| Green | #059669 | Emerald green — fresh, natural. |
| Orange | #ea580c | Warm orange — energetic, attention-grabbing. |
| Red | #dc2626 | Bold red — urgent, high-energy. |
| Dark | #1f2937 | Dark gray — sleek, minimalist. |
| Light | #f3f4f6 | Light gray — clean, subtle. |
Custom Theme Colors
For full control, use the custom color pickers:
| Color | Description |
|---|---|
| Background Color | The main background color of the chat widget header and send button. |
| Gradient Color | The secondary color used in gradients (typically a darker shade of the background). |
| Text Color | The color of text within the colored areas (header text, button text). |
| Hover Color | The color shown when hovering over interactive elements. |
Click Apply Custom Theme after setting your colors to see the result in the preview.
Chat Icon
Upload a custom image to replace the default chat bubble icon on the widget button. Supported formats: PNG, JPG, GIF, WebP, SVG.
| Control | Description |
|---|---|
| Preview | A circular 49×49 px preview of the current icon. Shows a placeholder chat bubble when no custom icon is set. |
| Upload Icon | Select an image file from your computer. The icon is uploaded immediately and a preview is shown. Remember to Save the configuration to persist the change. |
| Remove | Clears the custom icon and reverts the widget to the default chat bubble. Save the configuration to apply. |
window.iAIgW_icon directly (via the embed code), that takes priority over the icon configured here.
Visual Effects Controller
Add eye-catching animations to the widget icon to draw visitor attention:
| Setting | Type | Description |
|---|---|---|
| Effect Type | select | none — No animation. orbit — A gentle circular motion. pulse — A pulsing glow effect. shake — A quick shake to grab attention. |
| Delay (seconds) | number | How many seconds to wait after page load before the effect starts. Default: 5. |
| Duration (seconds) | number | How long the effect lasts. Set to 0 for infinite (repeats until the visitor interacts). Default: 0. |
| Teaser Texts | text | Comma-separated text bubbles that appear near the widget icon (e.g., Click me!, Need help?, Chat with us). These cycle through to entice visitors to open the chat. |
Click Apply Effects to see the animation in the preview.
Embed Code Snippet
After selecting a theme, an embed code snippet appears below the theme switcher. This is the HTML code you add to your website to display the chat widget with your chosen colors. Click Copy Code to copy it to your clipboard.
Re-Index Domain
Re-indexing re-crawls your website and rebuilds the knowledge base that your Guru uses to answer questions. You should re-index when:
- Your website content has changed significantly.
- You have uploaded or deleted Knowledge Files.
- You want the Guru to learn about new pages or products.
Click the Re-Index Domain button in the navbar to start. A popup appears showing 4 progress stages:
- Launching — Initializing the indexing job.
- Crawling — Scanning your website pages.
- Indexing — Processing and embedding content.
- Deploying — Activating the updated knowledge base.
A progress bar and status tiles show real-time updates via a live streaming connection. Click Toggle Logs to view detailed log output during the process.
Deploying Your Guru to Your Site
To make your Guru visible to visitors, embed a single <script> tag on your website. The widget loads asynchronously, displays a chat icon in the corner of every page, and opens the chat interface when clicked.
Universal Embed Snippet
This single line is all you need:
<script src="https://widget.instantaiguru.com/chat-widget.min.js?v=1.65" defer></script>
Place it in your site's HTML — ideally just before the closing </body> tag, or in the <head> if your platform requires it. The widget auto-configures itself from the settings you saved in this Admin panel: theme colors, chat icon, welcome message, model set, and everything else flow through automatically. No per-site configuration needed.
Cache Busting
The ?v= query string in the snippet URL is a cache-busting hint. When we ship widget updates, the version number changes, forcing browsers and CDNs to fetch the new file. Periodically check this guide (or release announcements) to see if a new version is available, and update the ?v= in your embed if so — older versions continue to work but won't have the latest features and fixes.
Platform-Specific Installation
The platforms below are listed alphabetically. Steps for each are typical — your specific theme or version may vary slightly, but the general pattern (head/footer custom-code injection) holds across all of them.
Shopify
Two paths, in order of preference:
- Theme app extension (recommended) — If you installed the InstantAIguru app from the Shopify App Store, the widget is already integrated as a theme app extension block. Activate it: Online Store → Themes → Customize → App embeds → toggle InstantAIguru Chat Widget on.
- Manual theme edit — If not using the app: Online Store → Themes → Edit code → open
layout/theme.liquid→ paste the snippet just before the closing</body>tag → Save.
WordPress
Two paths, in order of preference:
- InstantAIguru WordPress plugin (recommended) — Install our plugin from the WordPress Plugin Directory. Once activated, the widget is automatically included on every page. No code editing needed.
- Manual theme edit — If not using the plugin: Appearance → Theme File Editor →
footer.php→ paste the snippet just before<?php wp_footer(); ?>or before the closing</body>→ Update File. Alternatively, install a "Insert Headers and Footers" or "Code Snippets" plugin and add the snippet there to avoid theme-file edits.
WooCommerce
WooCommerce runs on top of WordPress, so the WordPress instructions apply directly. Use the InstantAIguru WordPress plugin (recommended) or a code-injection plugin. The widget appears on shop pages, product pages, cart, checkout, and account pages alike.
Squarespace
- Settings → Advanced → Code Injection.
- Paste the snippet into the Footer field.
- Save. The widget loads on every page of the site.
Adobe Commerce (Magento 2)
Two paths:
- Admin panel (no theme edit) — Stores → Configuration → General → Design → HTML Head → Scripts and Style Sheets → paste the snippet → Save Config → flush the cache.
- Theme XML — In your custom theme, edit
app/design/frontend/<Vendor>/<theme>/Magento_Theme/layout/default_head_blocks.xmland add the script via a<link>or<script>reference. Requires deploying static content and clearing cache.
Wix
- Site Dashboard → Settings → Custom Code → Add Custom Code.
- Paste the snippet, give it a name (e.g., "InstantAIguru Widget"), set placement to Body — end, apply to All pages, and toggle on for Load code on each new page.
- Apply & Save.
Joomla
Two paths:
- Custom HTML module — Extensions → Modules → New → Custom HTML. Paste the snippet, assign to a footer position (e.g.,
footerorposition-7), enable on all pages, save. - Template index.php — Edit your active template's
index.phpand add the snippet before</body>. Lost on template updates — the module approach is preferred.
Drupal
Two paths:
- Block (recommended) — Structure → Block layout → Place block → Add custom block. Body: paste the snippet, set Text format to Full HTML. Place in a footer region with visibility = All pages.
- Theme info file / preprocess hook — For developers: add the asset library via your theme's
.libraries.ymlor usehook_page_attachments()to inject the script.
PrestaShop
- Modules → Module Catalog → install a free module like Custom Code or HTML Box.
- Configure the module to add the snippet to the
displayFooterordisplayBeforeBodyClosingTaghook position. - Save. Alternatively, edit
themes/<your-theme>/templates/_partials/javascript.tpldirectly — lost on theme updates.
WHMCS
- FTP / file-manager into your WHMCS installation.
- Edit your active template's
header.tplat/templates/<your-template>/header.tpl, ORfooter.tplfor footer placement. - Paste the snippet inside the appropriate location and save. The widget appears on the client area pages.
/admin) use a separate template; embed the snippet only in the client-facing template unless you specifically want the widget on the admin side.
Webflow
- Project Settings → Custom Code.
- Paste the snippet into the Footer Code field (under "Code injected before
</body>tag"). - Save Changes → Publish your site.
Verifying Installation
After deploying, open your site in an incognito/private browser window. You should see the chat icon appear in the corner within ~1 second of the page load. Click it to open the chat — the Welcome Message you configured in the Preview panel should appear.
If the icon doesn't appear:
- Open the browser developer tools (F12 / Cmd+Opt+I) → Console tab. Look for any error messages mentioning
chat-widgetorinstantaiguru. - Check the Network tab for the
chat-widget.min.jsrequest — it should return HTTP 200. If 404, the snippet URL is wrong; if blocked, a content-blocker or CSP is preventing the load. - If your site has a strict Content Security Policy (CSP), you may need to allow
widget.instantaiguru.cominscript-srcandconnect-src. - If you have a cookie-consent banner that blocks scripts until consent: ensure the InstantAIguru widget is allowed in the "necessary" or "functional" category, or grant consent to test.
Flow Designer
The Flow Designer is a visual, IDE-style editor for building JSFE conversation flows and the custom tools they call — the deterministic, scripted logic that lets your Guru run multi-step tasks (OTP verification, payments, account lookups, Shopify actions) reliably instead of relying on the AI to improvise. Open it from the Design Flows button in the admin navbar (visible with the Admin or Config permission); it launches in a separate window.
{{ }} expression system are documented in the repository at github.com/ronpinkas/jsfe (also on npm) — treat the repository as the source of truth for what each step does. This guide documents the Designer tool: how to author, test, and save flows visually.
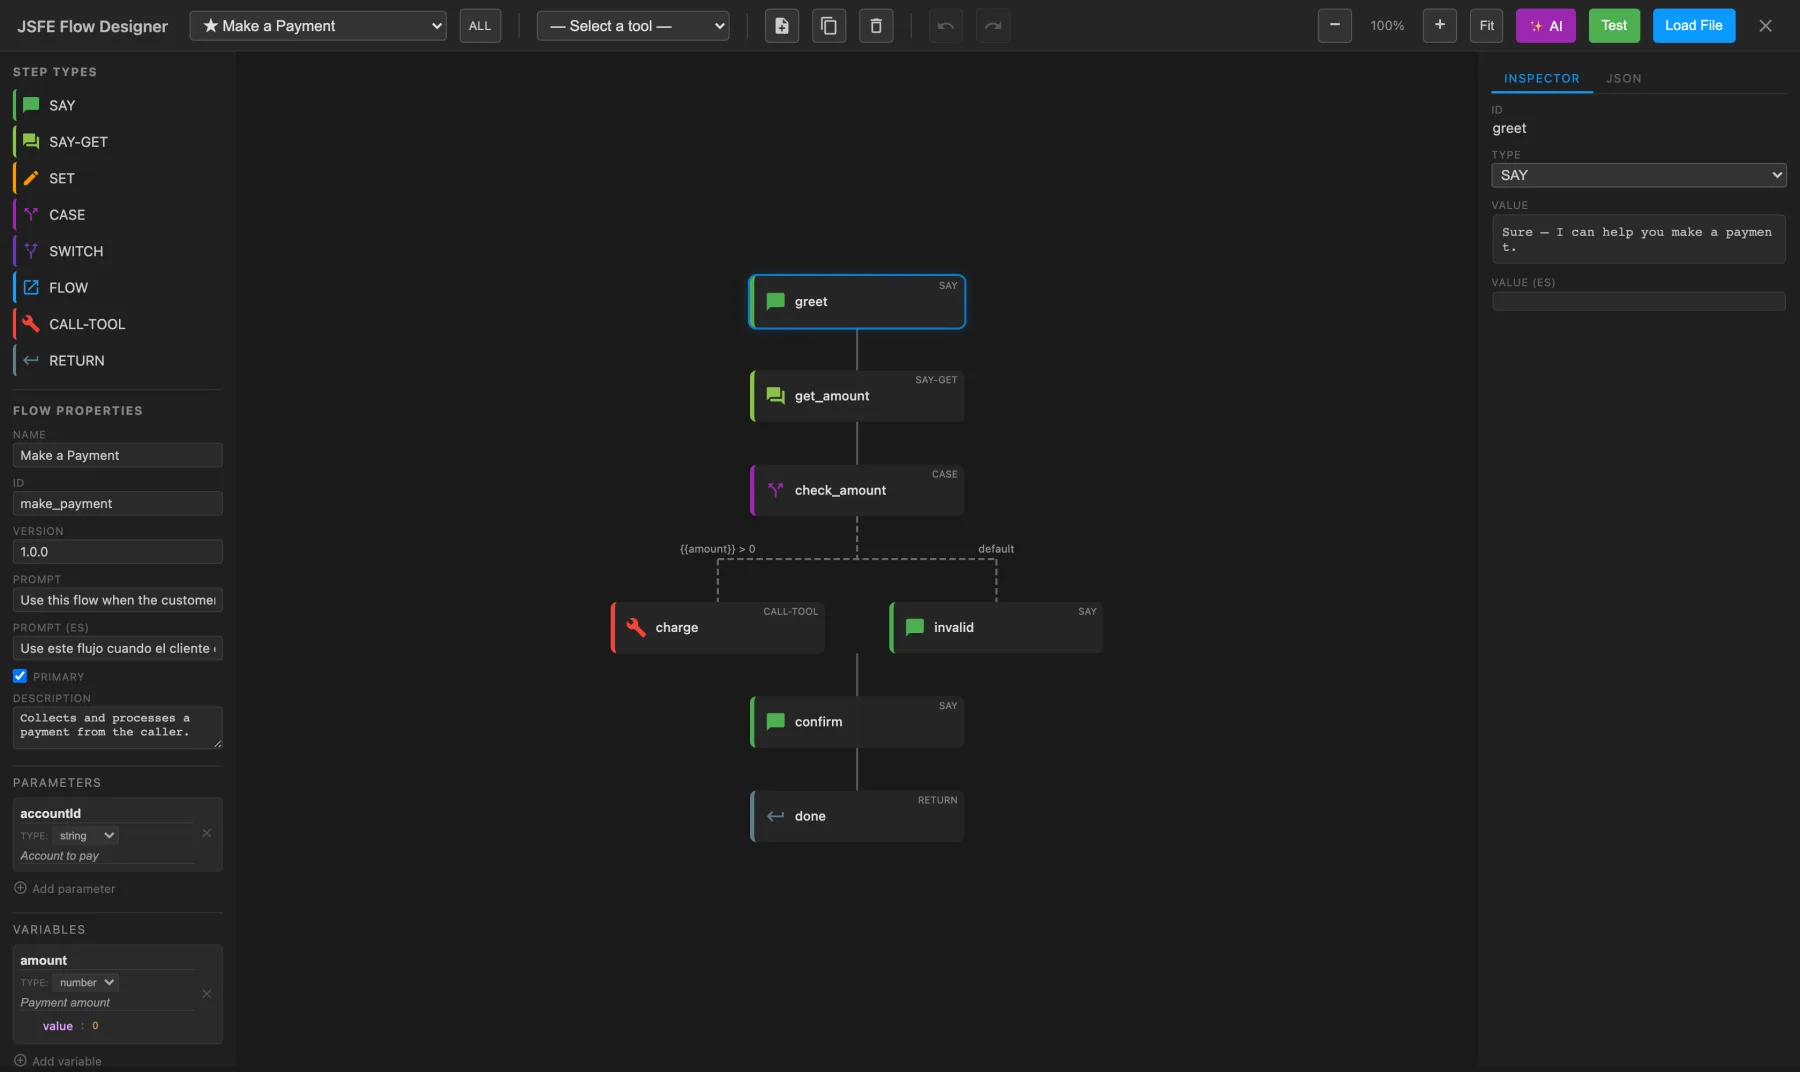
Opening it & how changes are saved
When you click Design Flows, the admin hands the Designer your current flows, tools, global variables, and a short-lived auth token (used by the Test runner and the AI Guru). Nothing is saved automatically — persistence is a deliberate two-step flow:
- In the Designer, click Save → review the changes → Send to Admin. This hands your edited flows and tools back to the admin window.
- Switch to the admin and click its Save button to persist them (written via the Config permission).
flow-designer.html on its own (“standalone”) lets you load/download .flows files, but the Test runner and AI Guru will not work — they need the auth token that only the Design Flows button provides. If the browser blocks the pop-up, allow it and click Design Flows again.
The workspace
| Area | What it holds |
|---|---|
| Top toolbar | Flow & tool selectors, item actions (New / Duplicate / Delete), Undo/Redo, zoom controls, and the ✨ AI, Test, Save, Load File, and Close buttons. |
| Left palette | A legend of the eight step types, plus the Flow Properties editor (name, id, version, prompt, parameters, variables). |
| Center canvas | The flow drawn as a vertical trunk of steps, with branches fanning out and sub-flows expandable inline. |
| Right inspector | Two tabs — Inspector (fields for the selected step) and JSON (the live {flows, tools} model). |
| Bottom test panel | The Flow Test Runner, hidden until you click Test. |
The palette, inspector, and test panels are all drag-resizable, and your layout is remembered between sessions.
Working with flows
The flow selector lists every flow (primary flows are marked ★); the ALL / ★ PRI button filters to primary flows only. Use New, Duplicate, and Delete to manage flows — built-in system flows are read-only and cannot be deleted. The palette’s Flow Properties section edits the selected flow’s name, id, version, description, prompt and prompt (ES) (the natural-language description the AI uses to decide when to run a primary flow), the primary flag, and its parameters and variables.
Building on the canvas
- Add a step: hover the trunk and click a green + insertion point, then pick a step type (or Paste).
- Select: click a step (single), Cmd/Ctrl-click to multi-select, Shift-click to range-select, or drag a marquee on empty canvas.
- Edit structure: Cmd/Ctrl+C / V to copy/paste, Delete/Backspace to remove (with confirmation).
- Navigate: two-finger scroll to pan, Ctrl/pinch or the + / − buttons to zoom, Fit to frame everything. Steps auto-arrange — you reorder by inserting/deleting and by moving branches up/down, not by dragging nodes freely.
- Sub-flows: a FLOW step can expand inline (chevron) to preview the called flow; a
rebootcall shows a jump arrow that navigates to the target flow.
The eight step types
Each insertion offers these step types. The table is a quick reference — for exactly what each does and how conditions and expressions evaluate, see the JSFE repository.
| Step | Purpose | Key fields |
|---|---|---|
| SAY | Send a message to the user. | Value, Value (ES), optional Digits |
| SAY-GET | Send a prompt and capture the reply. | Value, Value (ES), Variable, optional Digits |
| SET | Assign or compute a variable. | Variable, Value (expression) |
| CASE | Conditional branching (if / else-if). | Branches (condition → step) + default |
| SWITCH | Match a variable’s exact value. | Variable, Branches (value → step) + default |
| FLOW | Call a sub-flow. | Target Flow, Call Type (call / replace / reboot), Parameters |
| CALL-TOOL | Invoke a registered tool. | Tool, Variable (result), Args, onFail |
| RETURN | Return a value / end the (sub)flow. | Value |
Select any step to edit it in the Inspector. CASE and SWITCH get a branch editor (add, reorder, and delete branches; the default branch always stays last). Object and array values — parameters, tool args, and tool schemas — use a recursive tree editor with add/rename/delete and type selection.
Tools
Tools are the actions your flows can call (an HTTP API call, or a platform-approved local function). The tool selector lists them; built-in system tools are marked 🔒 and are read-only. Selecting a tool opens the full-canvas Tool Editor:
| Section | Contents |
|---|---|
| Basic Info | ID, Name, Description. |
| Implementation | Type = HTTP (url, method, content-type, headers, timeout, response mapping) or Local (a platform-approved function, its args, timeout). |
| Parameters | A JSON-schema tree (type, properties, required) describing the tool’s inputs. |
| Response Mapping | (HTTP only) how the response maps back into flow variables. |
| Security | requiresAuth, auditLevel, and dataClassification. |
Flows invoke tools through CALL-TOOL steps. Create a new tool with New while a tool is selected (or via the AI Guru).
The JSON tab
The Inspector’s JSON tab shows the live {flows, tools} model and doubles as an import/export surface: edit it directly, or drag and drop a .flows / .json file onto it. It accepts either a bare flows array or a {flows, tools} object; invalid JSON is flagged and not applied. System flows and tools are merged in for context but are never saved back as your own.
AI Guru (✨)
The ✨ AI button opens The Flows / Tools Guru — describe a flow or tool in plain language and it drafts one for you. Choose New Flow or Modify Current Flow (and the equivalents for tools), pick a model (Claude Sonnet 4.6 is recommended; GPT-4o, Gemini, and Llama options are available), and watch it stream a live preview with an AI Response notes panel; click Done to apply. When modifying, it computes the flow’s dependency set and marks any flow that is also used elsewhere as read-only, so a change can’t silently break another flow. The AI Guru needs the auth token, so open the Designer from Design Flows.
Testing a flow
Click Test to open the bottom panel and start a live session: the Designer loads the real JSFE engine and runs your flows merged with the system (and Shopify, if enabled) libraries against the backend.
| Part | What it shows |
|---|---|
| Conversation | The simulated exchange, with You / JSFE / SYS / HOST roles. Type in the input box and Send when a SAY-GET prompt is waiting; each Send advances the engine one step. |
| Variables | Live Session Variables, cargo, and an editable Global Variables tree. |
| Debug log | Color-coded step / say / set / flow / tool / error entries, with an Info / Warn / Error level filter. |
Saving your work
The Save button turns blue when you have unsaved edits. Clicking it opens Review Changes — a diff of the added, removed, and changed flows, steps, and tools — and Send to Admin hands them back to the admin window. A toast reminds you to then click Save in the admin to persist them. There is no autosave; edits live in memory until you send or download them. (In standalone mode, Save downloads a .flows file instead.)
Keyboard shortcuts
| Shortcut | Action |
|---|---|
| Delete / Backspace | Delete the selected step(s) (with confirmation). |
| Cmd/Ctrl + C / V | Copy / paste steps. |
| Cmd/Ctrl + Z / Shift + Z | Undo / redo. |
| Cmd/Ctrl + S | Save (opens Review Changes). |
| Enter | In a single-line field, commit the value instead of inserting a newline. |
Troubleshooting
| Symptom | Fix |
|---|---|
| Designer won’t open / blank window | A pop-up blocker stopped it. Allow pop-ups for the admin and click Design Flows again. |
| Test or AI says “No auth token” | You opened flow-designer.html standalone. Open it from the admin’s Design Flows button so it receives a token. |
| AI Guru is slow or times out | Usually a model cold-start; it streams and falls back automatically. Retry, or pick a faster model. |
| A field or the JSON tab shows a red border | The JSON is invalid and was not applied. Fix the syntax and it saves. |
| My changes didn’t stick | Remember the two-step save: Send to Admin in the Designer, then Save in the admin. |
Chat Dashboard
The Chat Dashboard provides a comprehensive view of all conversations your Guru has had with visitors. Access it by clicking the Chat Dashboard button in the Admin Portal navbar (or directly via URL). It opens in a separate tab.
Controls & Filters
Date Range
| Control | Description |
|---|---|
| Start Date | The beginning of the log search range. Format: YY-MM-DD HH:MM:SS. Click the calendar icon to use a date picker. Default: today at 6:00 AM. |
| End Date | The end of the log search range. Default: tomorrow at 6:00 AM. |
| Timezone | Toggle between UTC and Local Time for all displayed timestamps. A live clock shows the current time in the selected timezone. |
View Mode
Toggle between two display modes:
- Normal (default) — Shows 19 essential columns for faster loading and easier scanning.
- Advanced — Shows 29 columns including technical details like Log ID, version, token counts, model info, RAG timing, and chat context.
Loading Controls
| Button | Description |
|---|---|
| Load Logs | Fetches logs for the specified date range. Logs load automatically when the page opens. |
| Refresh | Incrementally fetches only new logs since the last load. The dashboard also auto-refreshes every 60 seconds when viewing a live time range. |
Theme Toggle
Click the moon/sun icon to switch between light and dark themes. The preference is saved to your browser.
Statistics Summary Bar
The colored badges below the controls show counts for different interaction categories. They serve a dual purpose — information display and interactive filters:
Non-Clickable Statistics
| Badge | Shows |
|---|---|
| Logs | Total number of currently displayed (filtered) log entries. |
| Users | Count of unique visitors (identified by IP, user ID, or thread). |
| Conversations | Count of unique conversation threads. |
Clickable Filter Badges
Click any badge to toggle that category's visibility. Ctrl+Click (or Cmd+Click on Mac) to show only that category (exclusive filter). Active filters show a pressed appearance; inactive filters appear dimmed.
| Badge | Color | Meaning |
|---|---|---|
| Unmarked | White | Interactions not yet rated for quality. |
| Correct | Green | Interactions marked as correct/accurate. |
| Incorrect | Red | Interactions marked as incorrect. |
| Incomplete | Orange | Interactions where the AI apologized or gave a partial answer. |
| Rejected Replies | Blue | Responses that were rejected before being sent to the user. |
| Rejected URLs | Brown | Responses rejected due to invalid URL references. |
| Truncated | Royal Blue | Responses that were cut short due to length limits. |
| Live Agent | Purple | Interactions that transferred to a live human agent. |
| Goodbye | Sea Green | Conversations that ended with a goodbye. |
| Call Ended | Gold | Voice calls that ended. |
| Switched to SMS | Lime Green | Voice calls that switched to SMS continuation. |
| Dark Green | Interactions from WhatsApp channels. | |
| SMS | Steel Blue | Interactions from SMS channels. |
Log Table
The main table displays all log entries matching your date range and active filters. Each row represents a single interaction (one user question and one AI response).
Normal Mode Columns (19)
| Column | Description |
|---|---|
| # | Row number. |
| IP | Client IP address. |
| Browser | User agent / browser information. |
| Country | Geographic country of the visitor. |
| Postal | Postal/ZIP code. |
| Org | Organization/channel indicator. Shows the channel source: TwilioVoice, TwilioSMS, app., WhatsApp, or the visitor's ISP/org for web traffic. |
| Thread ID | Unique conversation thread identifier. |
| Date Time | Timestamp of the interaction (in your selected timezone). |
| User ID | Visitor's identifier (email if known). |
| Full Chat | A clickable button showing the turn count. Click to view the entire conversation thread in a modal. |
| Prompt | The visitor's question or message. |
| Reply | The AI's response. |
| Rejected Urls | URLs that were removed from the response by the URL validator. |
| Rejected Answers | Response attempts that were rejected before the final answer. |
| Total Time | End-to-end response time in milliseconds. |
| Documents | Source documents retrieved from the knowledge base (with relevance scores and URLs). |
| Pertinent Docs | Documents deemed most relevant to the query. |
| Correct | Quality rating. Color-coded to match the filter badges. |
| Revised Answer | A human-edited answer, if one was provided for training. |
Additional Advanced Mode Columns
When Advanced view mode is enabled, these additional columns appear:
| Column | Description |
|---|---|
| Log ID | Unique identifier for this log entry. |
| Version | Software version that processed this interaction. |
| Chat Context | The conversation history sent with this prompt. Right-click to view as formatted chat bubbles. |
| Prompt Tokens | Token count for the prompt. |
| Analysis | The AI's analysis of the prompt, including any rephrased question. |
| Models | Which AI model(s) processed this interaction. |
| RAG Time | Time spent on document retrieval (Retrieval-Augmented Generation). |
| Attempts | Number of response generation attempts. |
| Completion Time | Time spent generating the final response. |
| Completion Tokens | Token count for the generated response. |
Table Interactions
- Click a column header to sort: ascending → descending → natural order (3-state cycle).
- Right-click a column header to hide that column.
- Hover over a truncated cell to see a tooltip with the full text.
- Right-click a truncated cell to open the full text in a modal. For Chat Context columns, this shows formatted chat bubbles.
- Click a Full Chat button to view the entire conversation thread.
- Rows are color-coded to match their category (green for correct, red for incorrect, orange for incomplete, etc.).
Export
Three export formats are available, each respecting your current filters and visible columns:
| Format | Description |
|---|---|
| CSV | Comma-separated values. Opens in any spreadsheet application. |
| JSON | Pretty-printed JSON array of objects. Useful for programmatic analysis. |
| XLSX | Excel workbook with a frozen header row, auto-sized columns, and styled headers. Best for sharing and analysis. |
Analytics Dashboard
Click Analytics Dashboard to open a full-screen overlay with charts and statistics based on your currently loaded and filtered logs.
Statistics Cards
At the top, 12 summary cards show key metrics:
- Total Interactions — Total number of log entries.
- Unique Users — Distinct visitor count.
- Total Conversations — Unique thread count.
- Multi-turn Conversations — Threads with more than one exchange.
- Multi-turn Rate — Percentage of multi-turn conversations.
- Avg Conversation Length — Average exchanges per thread.
- Longest Conversation — Maximum exchanges in a single thread.
- Accuracy Rate — Percentage of interactions not marked as incorrect.
- Avg Response Time — Average end-to-end response time.
- Countries — Number of distinct countries.
- Avg Prompt Tokens — Average input token usage.
- Avg Completion Tokens — Average output token usage.
Charts
The analytics dashboard includes up to 14 interactive charts. Some charts have a toggle to switch between "By Interactions" and "By Conversations" views:
- Usage by Hour of Day — Bar chart showing when visitors are most active.
- Answer Quality Distribution — Doughnut/bar chart of correct vs. incorrect vs. other categories. Toggle: by interactions or by conversation length.
- Countries Analysis — Horizontal bar chart of top 10 countries. Toggle: by interactions or by conversations.
- Usage Trends — Line chart of daily interaction volume (last 7 days).
- Response Time Distribution — Bar chart with time buckets (0–1s, 2–5s, 6–10s, etc.).
- Conversation Length Distribution — Pie chart showing how many conversations are 1 turn, 2 turns, 3–4, etc.
- Conversation Quality by Length — Bar chart of accuracy rate by conversation length category.
- Model Usage — Bar chart of top 8 AI models used.
- Domain Activity — Doughnut chart showing activity per domain (hidden for single-domain accounts). Toggle: by interactions or by conversations.
- Channel Distribution — Pie chart of Web, WhatsApp, SMS, Phone, and App channels. Toggle: by interactions or by conversations (with phone subcategories).
- RAG vs Google Sources — Pie chart showing the mix of RAG-only, Google-only, both, or no sources.
- Token Usage Trends — Line chart of average prompt and completion tokens per day.
- Accuracy Trends — Line chart of accuracy rate, correct %, and incorrect % over time.
- User Engagement Patterns — Bar chart categorizing users as Casual (1–2), Regular (3–5), Active (6–10), or Power (11+) based on interaction count.
Click Close Analytics to return to the log table view.
Saved Views
Save your current filter and display configuration for quick access later:
- Save View — Saves the current hidden columns, sort state, and active filter badges under a name you choose.
- Load View — Restores a previously saved view from the dropdown.
- Reset to Default — Select this from the dropdown to reset all filters and columns to their defaults.
Keyboard & Mouse Shortcuts
Chat Dashboard
| Action | How |
|---|---|
| Sort a column | Click the column header. Cycles: ascending → descending → natural order. |
| Hide a column | Right-click the column header, then select "Hide Column". |
| View full text | Right-click a truncated cell and select "Show Full Text". |
| View chat context | Right-click a Chat Context cell and select "Show Chat". |
| View full conversation | Click the numbered button in the "Full Chat" column. |
| Toggle a filter | Click a colored badge in the statistics bar. |
| Show only one category | Ctrl+Click (or Cmd+Click) a badge. |
| Show all categories | Ctrl+Click any badge when not all are active. |
Admin Portal
| Action | How |
|---|---|
| Switch tabs | Click a tab name in the tab bar. The last active tab is remembered between sessions. |
| Edit a user | Double-click a user card in the Users tab. |
| Select a user | Single-click a user card. |
| Expand/collapse a channel | Click the toggle arrow in a channel card header. |
Frequently Asked Questions
How do I connect Twilio for SMS and Voice?
Both SMS and Voice run through Twilio. Buy a Twilio number with SMS and Voice enabled, point its Messaging and Voice webhooks at InstantAIguru, and — for outbound SMS — register for A2P 10DLC (Voice needs no registration). Then click Add Twilio Channel in the Channels tab and paste your number, Account SID, and Auth Token. See Twilio Setup.
Why isn’t my chat widget appearing on my site?
Open your site in a private window and confirm the embed snippet is present before the closing </body> tag. Check the browser console for errors, that the script URL loads, and that a Content-Security-Policy or cookie-consent gate isn’t blocking it. The widget should appear within about a second of page load. See Verifying Installation.
How do I send post-call CSAT surveys, and what do I need?
Deploy the CSAT app, paste its secret and survey URL into the CSAT card on the Integrations tab, and configure delivery: an A2P-approved Twilio number (you can copy credentials from an existing SMS channel) and/or the Send CSAT Email option. The Guru then texts the caller a survey link at the end of a voice call. See CSAT — Post-call Surveys.
How do I reveal a hidden Auth Token or secret so I can copy it?
Every masked field — the Twilio Auth Token on SMS, Voice, and CSAT cards, plus the CSAT Secret and the WhatsApp Business Token — has a Show button beside or beneath it that reveals the stored value so you can verify or copy it.
Why won’t my changes save?
Saving is blocked by field validation before anything is written: the Number of Matching Documents to Evaluate must be 1–10, and if the CSAT secret is set you must also provide a survey URL and at least one delivery method — the form jumps to the offending field. Saving also fetches the latest server config first and offers a conflict-resolution dialog if another user changed the same fields. See Saving Changes.
What does the “Crawl External Pages” checkbox do?
On the General tab, enabling Crawl External Pages lets the crawler follow outbound links to other domains while indexing — useful when your knowledge base spans linked external pages. Leave it off to restrict crawling to your own domain. It takes effect on the next Re-Index.
Why does a channel card say “Configuration Required”?
That banner means the channel was added from your subscription but is still missing credentials. Fill in the highlighted fields (for example, the Twilio Account SID and Auth Token) to activate it. See Channels Tab.
How do I reply to customers from my own domain by email?
On an Email channel, type your address (e.g., [email protected]) into the From Address field and click Verify Domain. Add the three DKIM CNAME records and merge the Amazon SES include into your existing SPF record (do not add a second SPF). A status badge shows when the domain is verified. See Branded From Address.
Who can change the AI Model Set?
The Model Set editor on the Settings tab is shown only to users with the Admin or Config permission. Users without either permission don’t see it at all (it is hidden, not read-only). See Model Set.
How do I set live-agent transfer hours for phone calls?
Enter a Live Agent Phone Number on the Voice channel and the Live Agent Service Hours editor appears. Set a timezone and add one or more time ranges per day; days with no ranges are treated as closed and won’t transfer calls. See Live Agent Service Hours.
What are the Upload Flows, Upload Tools, and Design Flows buttons?
These navbar buttons (visible with the Admin or Config permission) manage the Guru’s interactive conversation flows and custom tools: Upload Flows and Upload Tools import JSON definitions, and Design Flows opens the visual Flow Designer to build them interactively. See Flow Designer.
What’s the difference between the Sole Proprietor and Standard A2P 10DLC paths?
Twilio routes your SMS registration by whether your company has a business/tax registration number. The Sole Proprietor path (no EIN) is faster to approve but has lower throughput limits; the Standard path requires a registered business and full Brand vetting but unlocks higher limits. See Sole Proprietor vs Standard Path.